Why Wooden Spoons Break at the Neck (And How to Design One That Won't)
I broke my first spoon trying to stir cookie dough, and standing there with two pieces of cherry in my hands, I wondered: how thin is too thin? Turns out, there's real engineering behind spoon necks—and it explains why carvers' intuition often matches what the equations predict.
CARVING PROCESS
2/18/202610 min read
I broke my first spoon trying to stir cookie dough.
The neck just snapped—a clean break right where the handle meets the bowl. I'd thinned it too much, chasing that elegant profile. Standing there with two pieces of cherry in my hands, I started wondering: how thin is too thin?
Our kitchen spoon drawer is full of what I call "misfit spoons"—ones that didn't quite work out. Sometimes the proportions are off or the spoon came out too flat. But more often than not, the culprit is overcarving. Too much wood came off in the pursuit of the perfect shape. "Just one more cut!"
While this might be okay at the base of the handle or in the bowl, it's usually the kiss of death at the neck. Taking too much off is a common beginner's mistake, and I should know better—the neck is the hardest area to carve. The tight radius curves, changing grain directions, and the desire to keep it thin and elegant all conspire against you. If something is going to go wrong, it's there. And if a spoon is going to break? Same place.
As a carver, I usually work by eye and feel. I watch the grain, test the flex, adjust curves until everything looks right. But I'm also an engineer at heart, and the more spoons I carve, the more I realize that "looks right" and "structurally sound" are often the same thing. Craftspeople have always known what works—cathedral builders didn't need finite element analysis. But underneath that intuition are real forces, real stresses, and real material limits.
So I decided to figure out exactly what's happening when a spoon bends, and how to design a neck that won't fail. Spoons aren't rocket science, but the engineering principles at work here—understanding stress, respecting grain direction, knowing a material's limits—apply to any woodworking project. Whether you're carving spoons or building furniture, the wood follows the same rules. Going through the math helps reveal those rules and shows where intuition comes from.
Fair warning: This post contains math. But I've tried to keep the explanations as intuitive as possible—you don't need an engineering degree to follow along. And if you just want the practical takeaways, feel free to skip ahead to the neck size calculator at the end.
Why Spoons Always Break at the Neck
Every broken wooden spoon I've seen failed in the same place: the neck. That narrow transition between handle and bowl is where all the stress concentrates.
Here's what's actually happening when you stir. The bowl pushes against thick oatmeal or sticky dough. Your hand grips the handle and won't let the spoon rotate freely—you're holding it in place. Engineers call this constraint a reaction moment, but really it just means there's a grudge match of forces taking place and—in the end—something has to give. Since the spoon can't rotate, it bends instead.
This is the same problem as a diving board: load at one end, support at the other, maximum bending in between. The amount of bending depends on two things: how hard the food pushes back, and how far that force is from your hand. In engineering terms:
Bending moment (M) = Force (F) × Lever arm length (L)
This simple equation explains why stirring cookie dough with a long spoon is asking for trouble. Thicker food means bigger force. Longer spoon means bigger lever arm. Either way, the neck has to handle more bending.
Here's what real stirring forces look like:


(For context: forces are measured in Newtons (N), where 1 N is roughly the weight of an apple in your hand.)
For the rest of this post, I'll use 15 N and a 7-inch lever arm (typical for a medium cooking spoon). That gives us a bending moment of about 2.67 N·m—imagine holding a meter-long stick with three apples dangling from the end. Not huge, but enough to break a poorly designed neck.
How Bending Creates Stress (and Why Shape Matters So Much)
When the neck bends, something interesting happens. The top surface stretches and the bottom surface compresses. The wood fibers on the outside curve are working the hardest—they're the ones that will break first. Wood is more brittle in tension than compression; the top stretches and snaps while the bottom just buckles. Meanwhile, the middle layer barely feels anything.
Stress is how hard the wood fibers are being pushed, pulled, or twisted inside the material when a load is applied. More specifically, it's the internal force per unit area. Think of it this way: the same total force spread over a larger area creates less stress, just like lying on a bed of nails hurts less than stepping on a single nail.
Stress = (Bending moment × Distance to outer fiber) / Shape's resistance to bending
Or in engineer-speak:
σ = (M × c) / I
where the stress on those outer fibers depends on three things:
M is the bending moment we discussed above.
c is the distance from the midline of the shape to the outer edge.
I is the 'second moment of area' and depends on the shape of the neck's cross section
That last term, I, is fascinating -- and it's pure geometry. It depends only on the cross-section shape, not what the spoon is made of. A cherry spoon and a steel spoon with identical dimensions have the same I. For a simple rectangular neck:
I = (width × height³) / 12
To give some context, the table below shows how I varies relative to a square cross section across some common shapes (where I've kept the total cross-sectional area the same). Deriving I for these other shapes requires a bit of calculus, which I will spare your from here, but you can still do the calculations for these shapes using the design calculator below.

Putting it all together and doing a little substitution—the practical version of our stress equation for a rectangular cross section becomes:
σ = (M × c) / I
σ = (M × c) × 12 / (width × height³)
σ = (M × height / 2) × 12 / (width × height³)
σ = (6 × M) / (width × height²)
or, with one final substitution for M:
σ = (6 × F × L) / (width × height²)
A key thing to notice is that height is squared. This is huge. If you make the neck 40% taller, you don't just get 40% more strength—you nearly double it (1.4² ≈ 2). Height matters way more than width, which should be intuitive when you think about bridge trusses, I-beams, or why floor joists are oriented the way they are.
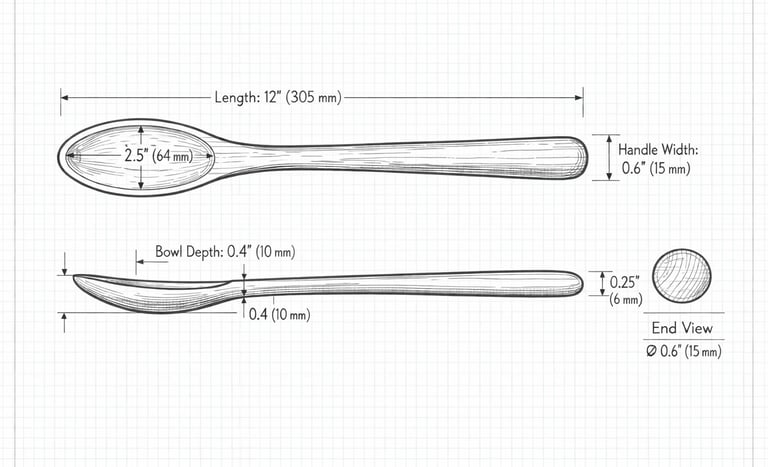
This explains why spoon necks are almost always taller than they are wide. When I measured my favorite cooking spoons, the ratio was around 1.5:1 (height to width). I didn't calculate that when I carved them—I just kept removing material until it felt right. Turns out I was subconsciously optimizing for structural integrity.
Every millimeter you add to the height drops the stress dramatically. Every millimeter you shave off increases it dramatically. That's why spoon necks are so unforgiving!
So now I'm stressed. What next??
We've calculated the stress on our spoon. Now we need to know: can the wood handle it?
To answer this, we compare the stress to the wood's Modulus of Rupture (MoR)—the stress level where it breaks in bending tests. If our calculated stress is less than the MoR (scaled back for a "factor of safety"), the spoon should hold up.
Different woods have different MoRs. The table below shows values for common spoon woods, assuming the grain runs straight along the length:

Before we go further, it's important to call out that the MoR numbers above assume ideal conditions—specifically, perfectly straight grain. And this is where things get interesting.
Wood is not uniform like metal or plastic. It's made of millions of long, tube-like cells running parallel to each other—imagine bundles of drinking straws all pointing the same direction. If you've ever split firewood, you've felt this structure.
When you bend wood along the grain (parallel to the straws), it's incredibly strong. The fibers stretch like cables. But if the grain runs out the side of your spoon neck—what carvers call runout—those fibers don't span the full distance. You're pulling them apart sideways, and wood is much weaker that way.
In terms of our math, this means the MoR drops—way down. Engineers have studied this and shown that grain angle has a massive effect on strength. Even modest runout (a 1:4 slope) can cut the effective MoR in half.
This is why experienced carvers (and chair makers) split or "rive" their blanks instead of sawing them. Riving follows the grain lines, so the fibers stay continuous from handle through neck to bowl. Sawing slices across grain randomly—you might get lucky, or you might create a fatal weak spot right where it matters most.
Riving isn't just traditional—it's structurally smart.
It's also why engineers use a Factor of Safety (FoS)—basically a 2× or 3× "fudge factor." Instead of designing right at the breaking point, we design so the anticipated stress stays well below the MoR. This accounts for imperfections: hidden knots, moisture changes, some grain runout. Factor of Safety of 3 is conservative (good for kitchen tools that see variable use); FoS of 2 is lighter but riskier.
Designing a Real Spoon Neck
Let's put all this together and design a neck that won't break. I'll work through cherry wood, but the same process works for any species.
Our scenario:
7-inch lever arm from grip to bowl (0.178 m)
15 N force (heavy stirring)
Slightly tall cross-section (height = 1.5 × width)
Straight grain through the neck
Step 1: How much bending?
M = F × L = 15 N × 0.178 m = 2.67 N·m
Step 2: What can cherry handle?
Cherry has a modulus of rupture (MoR) around 12,300 psi—that's the stress where it breaks in bending tests. But we don't design right at the breaking point. I'll use a safety factor of 3, which is standard for things with variable loads.
Allowable stress = 12,300 ÷ 3 = 4,100 psi (~28.3 MPa)
Step 3: Solve for dimensions
Using our stress equation with h = 1.5w:
σ = (6M) / (w × h²) = (6M) / (w × (1.5w)²)
= (2.67M) / w³
Rearranging and solving:
w³ = (2.67M) / σ
w³ = (2.67 × 2.67) / (28.3 × 10⁶) = 2.52 × 10⁻⁷ m³
w ≈ 6.3 mm (about ¼ inch)
h = 1.5w ≈ 9.5 mm (about ⅜ inch)
If there's runout: Cut the allowable stress in half (14.2 MPa), which means dimensions increase by about 26%:
Width: 8.0 mm
Height: 12.0 mm
When I measured my cherry cooking spoon, the neck is almost exactly 7 × 10 mm. I didn't calculate that when I carved it—I just kept removing material until it felt right. But "felt right" landed within a millimeter of what the math predicts. That's the interesting part: experienced carvers' intuition often converges on the same answer as the equations.
Design Cheat Sheet
The figure below shows the dimensions for common spoon woods, assuming a 7-inch spoon under heavy stirring loads (15 N) and rectangular cross-sections with a 1.5:1 ratio of height to width. Factor of Safety 3 is conservative (good for kitchen tools that see variable use); FoS 2 is lighter but riskier.
These are starting points, not absolutes. A spoon that only stirs soup can be more delicate. A spoon for stiff dough needs to be stouter. Longer spoons need beefier necks. Adjust accordingly.
What matters most? Grain orientation trumps everything. Runout can cut your effective strength in half, requiring 27% larger dimensions across the board. Wood species matters, but less than you might think—going from the strongest wood (Birch) to the weakest (Bradford Pear) only requires about 14% more material. Height is far more important than width because it's squared in the stress equation. If you have to choose, add height before width.

Design Calculator
Want to play around with different scenarios? The calculator below lets you design your own spoon neck with custom inputs to match your specific design.
Click here to join my Email list to read more posts like this one!
Conclusion
I still carve mostly by feel. I don't pull out calipers for every spoon. But now when I'm shaping a neck, I'm not just thinking "does this look elegant?" I'm also thinking: are there enough fibers spanning this section? Is the grain running clean through? Am I using the right wood for how this spoon will be used?
The equations didn't replace intuition—they explained it. When a spoon neck "looks too thin," there's a reason. When an experienced carver says "that grain won't work," they're right, and now I know why.
Antoine de Saint-Exupéry once said, "A designer knows he has achieved perfection not when there is nothing left to add, but when there is nothing left to take away." Nothing could be more true for spoon carving, where the whole process is one of subtraction—deciding what to remove and, crucially, what to leave behind. The medieval cathedral builders didn't have Saint-Exupéry's words or stress equations, but they knew flying buttresses had to be a certain size or the walls would collapse. They learned through experience, failure, and observation. The physics was there all along.
A wooden spoon is a tiny structure under real loads. The neck is doing genuine structural work, and the wood is either strong enough or it isn't. Whether you understand that through broken spoons or through beam equations, you end up in the same place: respect the forces, respect the grain, and make the neck thick enough to do its job.
Your next batch of cookie dough will let you know if you got it right!
Spoonweather
Hand carved wooden spoons honoring local trees and community. Made in the USA .
© 2025. All rights reserved.
Learn more
Navigate
Connect
Needham, MA